Search This Blog

Thursday, June 25, 2015

Memorizing vs. Understanding

Learning How to Learn


        To quote Maimonides, “Give a man a fish and you feed him for a day; teach a man to fish and you feed him for a lifetime.”  As a band teacher, I have witnessed learning without understanding (in my own program and the programs of other teachers).  Students learn a song (or group of songs) and then perform them in a concert.  However, the students are simply physically performing a rote activity that was instilled through repetition.  The students are still totally reliant on the teacher when attempting to “learn” a new song.  They have learned how to play a song, but not how to learn songs.  Understanding is the key to learning how to learn.  This leads to an eventual state of independence from the teacher. 


Acquiring vs. Applying Knowledge


Initially, the role of a teacher is both to acquire valid sources of knowledge for the student and aid the student in applying the knowledge.  We never become independent from the need to acquire knowledge.  When we learn how to learn, we become independent from the need for an intermediary who explains how to apply knowledge.  With an increased understanding of application comes an increased discernment of good and bad sources of knowledge.  This leads to an increased ability to seek out good sources of new knowledge (better ability to acquire) which leads to more application (the process is a cycle).


Specific Teaching Method Being Challenged


I have had a commenter question my approach to teaching the possible pitch names in music.  He insists that all names which are redundant due to enharmonic equivalence should be omitted, and that I should teach only 12 pitch names.  However, when we insert these 12 tones into the realm of music theory a problem occurs.  Although there are only 12 tones (pitch sounds) in music, there are not only 12 possible pitch names.  The language of music contains multiple names for each tone depending on the context of the situation.  If a person only knows 12 pitch names, what will happen when the music they are reading asks them to play a pitch name that they haven’t learned?  In the accompanying video, I provide several examples where a 12 pitch name approach may cause confusion.

I have selected to teach pitch names a certain way for a specific reason.  My goal is to help students understand concepts, not to have them just memorize information.  I do not want students to memorize the 21 possible pitches in my illustration.   I don’t want them to even memorize 12 pitches.   I want them to understand where all of the possible pitches come from (why they exist).

If anything is being memorized, it is the seven letters of the musical alphabet (which are the 1st seven letters of the English alphabet).  Each letter can be either sharped or flatted.  This concept leads to an understanding of the existence of every possible pitch name.

The best example of the concept I am explaining today is in my lesson called Memorizing Scales.  I teach memorization in this lesson, but it is based on an understanding of the formation of key signatures (I still use the 21 possible pitch graphic).  The 1st time I used this graphic was in my lesson called The Musical Alphabet, where I teach about enharmonic equivalence.  Even in my Chord Progressions lesson, I implement the practice of teaching for understanding instead of rote memorization.  I believe this practice is why so many people have found this lesson helpful.  

        This Learning Music With Ray video compares and contrasts teaching (and learning) styles that emphasize memorization against ones that emphasize understanding.  The primary reason for this video is to respond to a question generated in the comment section of my Chord Progressions lesson.  I do not want my viewers to be confused about the teaching methods that I used in my lessons.  I hope that this video helps to bring clarification. 


Wednesday, June 17, 2015

Worship Piano Rhythmic Patterns (introduction)

                All music (including worship music) contains a groove.  Groove is the musical rhythmic pattern that pushes the listener through the piece.  Groove differs from beat in that a beat is a sterile repeating pulse or click that establishes the tempo of the piece.  It has no sense of musical identity or character.  A groove is a rhythmic feel or pattern that does have a sense of musical identity or character.  Although groove does help to establish the tempo, it also establishes the style of the piece.
Like the strum and pick patterns of a guitar, a piano/keyboard can be played with different rhythmic patterns.  These patterns can help to establish the groove.  Accents and dynamics play a large role in establishing groove.  The ability to maintain a stable performance of repeated notes with little no dynamic variation may be desirable in some classical performance situations.  However, in many other styles accents and dynamic contrast often add to the musicality of a groove.  In the accompanying video, I demonstrate several examples of this on the piano.
Piano/keyboard players need to listen to the groove of the piece (and/or the other instruments) and perform in a style that fits that groove.  Rhythmic patterns and performance details (such as dynamics, articulation and other forms of expression) that complement the other aspects of the groove should be accentuated in the piano/keyboard part.  This includes the selection of register on which the performer chooses to play.  Since the piano/keyboard has the largest range of all the instruments in the band (or other musical ensembles), we have the ability to select a register that will complement the overall orchestration of the song.  We can avoid crowding registers that already contain a good deal of sonic information.  We can also fill these areas in moments when the arrangement is sparse, or when we are called upon to take the forefront. 

In the case of keyboard playing, different grooves and styles may also call for different sounds.  Since this instrument has the ability to change its sonic character, why not use this to help complement the arrangement.  Certain sounds will blend better with the other instruments in the arrangement.  In addition, certain sounds will complement the groove of the song better than others.  In the accompanying video, I demonstrate several examples of this on the keyboard.
                This Learning Music With Ray video discusses the implementation of rhythmic patterns in worship piano playing.  The concepts covered can actually be applied to any style of chord based piano playing.  The main focus of the lesson is to provide a detailed understanding of the definition and function of groove within music.  I discuss the difference between beat and groove.  I also provide musical examples of a simple chord progression being played in different musical styles.  With each example, I discuss the elements of the groove that help to determine which piano rhythmic patterns would complement the performance.  


Wednesday, June 10, 2015

Time Signatures 2

In our last lesson we discussed the basic concepts pertaining to time signatures.  There are several additional concepts that extend beyond what was covered last time.  Today we will take the time to discuss these concepts and obtain a more thorough understanding of time signatures.

Common Time

The most common time signature found in music is 4/4.  Because it is so common, the other name we use as an abbreviation is common time (they mean the same thing).  The symbol used to indicate common time is a C in the place where the time signature normally is. 


Other Base 4 Time Signatures

As we mentioned in part 1, a time signature can have any number on the top.  The most common top numbers in a base 4 time signature (beside 4) are 2 and 3.  However, more complex types of music may use other numbers (ex: Take Five – from the Dave Brubeck Quartet).  In these cases it is important to remember that the quarter note gets one beat (and the other rhythms are counted accordingly).  The top number dictates the number of beats found in each measure, so a song in 5/4 would be counted 1-2-3-4-5 / 1-2-3-4-5.  This type of counting may feel more awkward since it is less common.  However, repeated use will cause a performer to become familiarized with these uncommon time signatures.


Cut Time

Another time signature that uses the symbol of a C is cut time.  Here the C is marked with a slash to indicate that it is cut.  This is an abbreviation for 2/2 since each number of common time has been cut in half.
If we understand how to simplify fractions, then we realize that 4/4 and 2/2 are mathematically equivalent to each other.  So, why do we have cut time?  Why not just use common time?  When we are keeping the beat to a fast song in common time, we reach a point at which it becomes difficult to tap or clap any faster.  At this point, it is easier to tap every other beat (1 & 3) instead of every beat.  When we do this, we are really tapping 2 beats per measure and giving the half note a value of one beat.  This results in the creation of cut time.


Other Base 2 Time Signatures

The same rules apply in base 2 time signatures as far as the top number is concerned (any number can occur).  The most common number is 2 due to our need for cut time (as described in the last slide).  Any other time signature can be adequately covered in base 4.  However, other base 2 time signatures can occur in theory.  In these cases, simply count the number of beats per measure indicated by the top number, remembering that the half note receives one beat.

6/8 Time

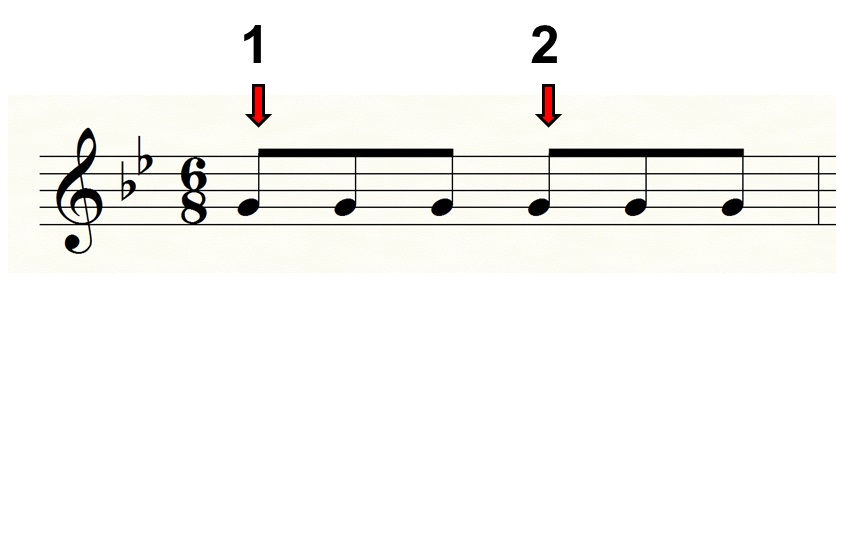
            6/8 time is actually very similar to 3/4.  Both of these time signatures contain 6 eighth notes per measure.  However, they group the eighth notes differently.  In 3/4, the eighth notes occur as 3 groups of two.  In 6/8, they occur as 2 groups of three.  Because of this, 6/8 can also be view as a triplet form of 2/4 time.


6/8 In 2
Since 6/8 time contains 2 groups of 3, performers may count only the 1st and 4th beat when the tempo gets faster.  The reason for this type of counting application is similar to the use of cut time explained earlier.  We call this “counting in 2” (it’s like a triplet version of 2/4).           


Other Base 8 Time Signatures

     Since base 8 time is like a triplet form of base 4, most other base 8 time signatures contain top numbers that are multiples of 3 (3/8, 9/8, 12/8…).  However, other top number can occur in base 8 time signatures (in theory).  In these cases, simply count the number of beats per measure indicated by the top number, remembering that the eighth note receives one beat.

Mixed Meter


            Another complex occurrence in music is the existence of multiple time signatures within a piece.  This is called mixed meter.  Mixed meter usually exists in a regularly occurring pattern that fits into a larger meter.  For example, a repeating pattern of two measures of 2/4 and one measure of 3/4 may be used as a replacement for an overall pattern of 7/4.  Mixed meter can also occur with random changes, however this is less common.  Music is usually composed of patterns.  The more random a piece of music is, the more difficult it becomes for the listener to follow.


This Learning Music With Ray video is a continuation of our lesson on time signatures.  In it, I discuss special cases such as common time, cut time and 6/8 time.  I explain the reason for the creation of these cases and the relation of cut time and 6/8 time to other time signatures.  I also discuss more challenging time signatures (such as 5/4 and 7/4).  Finally, I cover the topic of mixed meter (having multiple time signatures).  


Wednesday, May 27, 2015

Time Signatures part 1 The Basics

         A time signature is an indicator of the rhythmic parameters of a piece of music. It consists of two numbers (one stacked on top of the other). Each number tells us something about the way the rhythms of the piece should be read and counted. The top number tells us how many beats are contained in each measure of the piece. The bottom number tells us which note receives the value of one beat in this piece of music.


          Time signatures are located in the beginning of a piece of music. The first symbol to the very left of the musical staff is the clef. This tells us which five lines are represented by the staff. To the right of the clef is the key signature. If the piece is written in the key of C major or A minor (no sharps or flats) then there will be no symbols indicated in the key signature. If the piece is written in any other key, the sharps or flats of that key will be indicated in the key signature. To the right of this (on the 1st musical staff) is where we find the time signature.


          The top number of a time signature can be any number. This means that we can have any number of beats per measure in a piece of music. However, since most music tends to follow symmetrical rhythmic patterns most simple pieces contain either two, three, or four beats per measure. The most common time signatures contain a four on the bottom; and either a two, three or four on top. When there is an eight on the bottom of the time signature, the most common top number is six. However, more complex musical pieces can contain diverse rhythmic patterns. In these cases, other (less common) numbers are used on the top of the time signature. These types of time signatures will be discussed in more detail in future lessons.


          The bottom number of a time signature can only be part of a sequence starting with 1 and continuing with the double of the number that precedes it. In other words, the numbers of this sequence are: 1, 2, 4, 8, 16, 32, 64, 128… and they continue on in this pattern. The reason for this specific sequence is the fact that each bottom number of a time signature corresponds to a note value (1 = whole note / 2 = half note / 4 = quarter note / 8 = eighth note / 16 = sixteenth note / 32 = thirty-second note …).


          One method I use to help my students realize the value of the bottom number of a time signature involves the visualization of fractions. I have them convert the time signature into a fraction. Next, we discard the top number since we are only concerned with the value of the bottom number at the moment. We replace the top number (or numerator) of this imaginary fraction with a 1. The fraction that results from this process represents the name of the rhythmic value that receives one beat in this time signature. A fraction of ½ corresponds to the half note; a fraction of ¼ corresponds to the quarter note and so on.


          In beginning music lessons most teachers tell their students that the quarter note receives one beat, the half note receives two beats, the whole note receives four beats and the eighth note receives half a beat. This information is correct if the bottom number of the time signature is a four. However, the actual beat values of each rhythm are not set throughout all musical examples. They change based on the bottom number of the time signature. What is set is the relative length of each rhythmic value in comparison with each other. A half note will always be half the value of a whole note. A quarter note will always be a quarter of the value of a whole note and half the value of a half note. Beginning music teachers tell the “white lie” of set rhythmic values because it is too difficult to explain the actual system of rhythmic values to a beginning music student (in most cases). Plus, most beginning music contains time signatures that have a four as the bottom number. Later on, when the student begins to experience time signatures with other numbers on the bottom, we explain the actual system of rhythmic values. In the video, I provide a chart that displays the rhythmic values of a whole, half, quarter and eighth note in time signatures that contain either a two, four or eight as the bottom number. This chart does not cover every rhythmic value under every type of time signature, but it displays enough values to illustrate the concept.


This Learning Music With Ray video discusses time signatures.  In it, I discuss the location of the time signature in a piece of music and the information it provides for the reader.  I point out the significance of the top and bottom numbers and explain the musical parameters covered by each number.  


Wednesday, May 20, 2015

Memorizing Scales

                A keysignature is a collection of seven pitches that a diatonic piece of music is composed of.  One could think of it as the pitch ingredients within the recipe of a song.  There are 21 total chromatic pitches in music.  This is a result of a seven letter musical alphabet in which each letter can be either sharp, flat or natural.  However, diatonic music selects seven of these 21 pitches as the pitch framework for a particular song.  Diatonic music is limited to one type of each letter in the musical alphabet. 


            The order in which sharps or flats are added to the list of the 7 pitches of a key signature is determined by a mathematical component of music called the circleof fifths.  The key of C major or A minor contains no sharps or flats, so this key signature acts as the starting point of the circle of fifths.  If we travel up a fifth from there (counting C or A as one) we reach the key that contain one sharp (G major or E minor).  Continuing up in fifths will reveal the tonic for two sharps, three and so on.  Traveling down a fifth from C or A will reveal the tonic of the key with one flat (F major or D minor).  Continuing down in fifths reveals the other flatted tonics.  This circle of fifths diagram graphically depicts the order of the cycle.  Major keys are listed in the outside circle and minor keys are listed in the inside one.  At the bottom of the circle, we reach a point where additional sharps or flats would be inefficient.  Once the number of flats or sharps in a key signature exceeds six the resulting key overlaps the opposite side of the circle.  For example, the key of C# major which contains 7 sharps is the enharmonic equivalent to Db major which contains only 5 flats.  For this reason, the circle of fifths diagram usually only depicts the simplest form of each key signature.  For a more in-depth discussion on the circle of fifths, please refer to my blog posts from 5/28/14 and 6/4/14


               A scale is a consecutive listing of the 7 pitches within a diatonic key.  In our previous lesson on key signatures, we discussed that a diatonic key is a selection of 7 of the 21 possible pitches in music.  The selection is limited to 7 because each letter in a diatonic key is limited to one type (either flat, natural or sharp).  The listing of pitches within a scale always starts and ends with the tonic pitch.  The purpose for practicing scales on our instrument is to familiarize ourselves with the 7 diatonic pitches of a given key.
                Music students often learn their scales by reading them off of a piece of sheet music.  To memorize the scales, they practice repeatedly until the movements required to perform the scale are committed to muscle memory.  This method of memorization can be unreliable since it does not employ a cognitive understanding of the pitches in the sequence.  This lack of cognition also robs the student of the true benefit of practicing scales, which is familiarizing ourselves with each key signature.  Once we can mentally distinguish the pitches of a particular key signature, we can free ourselves to play a musical passage without accidentally hitting pitches outside of the key.
                If we visualize the 21 pitches of music, we can practice picking out and naming the 7 consecutive pitches of a scale.  We start by naming the 7 letters of that scale, beginning with the tonic letter (name of the key or scale) and looping around the 7 letters.  This is something that can easily be memorized since it is the first 7 letters of the English alphabet.  Then we simply apply the key signature (derived from the circle of fifths) of that scale while naming the letters.  We practice naming and then playing each pitch of the scale while keeping a steady beat.  Gradually, we increase the tempo and decrease the delay between naming and playing the pitches (eventually this requires naming the pitches in our head instead of out loud).  Finally we reach a point where we can name and play the pitches almost simultaneously, and at a decent tempo.  This method provides the confidence of cognitive pitch recognition as opposed to mere muscle memory reliance. 
                This Learning Music With Ray video discusses the method I use to help my students memorize their scales.  The primary reason for the study of scales is to develop an understanding of key signatures.  Truly knowing a scale frees musicians to mentally contain themselves within the confines of a given key.    In this video, I use the circle of fifths and a display of the 21 chromatic pitches to practice visualizing the seven pitches of a particular scale.  I demonstrate a process of naming and playing each pitch that ensures cognitive recognition of each pitch in the scale. 


Wednesday, May 13, 2015

Gospel Piano (part 4) Song Arrangement

                The chords used to create the harmony for gospel songs usually change every two or four beats (sometimes they are held even longer).  The frequency of the chord changes within a song is referred to as the harmonic rhythm.  Occasionally, there are passages that contain a chord change on every beat, but these are brief moments in the songs.  Few songs contain that fast of a harmonic rhythm throughout their entire chord structure. 
                This usual harmonic rhythm of change every 2 to 4 beats creates gaps in the music where nothing is happening.  Guitar players often fill in these gaps with rhythmic strumming patterns.  Piano players, however, cannot strum their instrument.  We need to use other techniques to fill in the empty space in the music.  We can strike the keys in a repeating pattern (similar to strumming), but this often results in a playing style that is simple, predictable and musically boring.  The music is taken to another level when we create an arrangement that includes a variety of techniques crafted together.
                Before creating a piano song arrangement, we must consider the context that the arrangement will be used in.  When playing with a band, it is often desirable to leave open gaps in the arrangement and not fill up each moment.  This leaves space for the other instruments to play.  If everyone in the band is filling every gap with their own full arrangement, they will be playing on top of each other and the music will sound cluttered.  Instead, each musician should take turns filling in the gaps while the others leave room.  Even when we are just accompanying a singer on the piano, we need to be sensitive to what the singer is doing.  We should leave open space when the singer is performing a complex melodic passage (or adding a run).  Then we can fill in the moments where the singer leaves open space.  We may even choose to leave the space open if the mood calls for that kind of playing. 
                When playing by ourselves, piano players can take the liberty to fill in more of the empty space.  We should still be sensitive to what is going on in the music and the flow of the performance, though.  Most songs (like all forms of entertainment) follow a natural progression of development.  They usually start off simple and pure.  Then things begin to develop and grow as the song progresses.  Finally, we reach a climax (the biggest part of the song) which is followed by a resolution.  We should keep the overall shape of this musical arch in mind when creating a song arrangement.  A simpler arrangement in the first verse, followed by increasing complexity will help to accent the development of the song.    
                Melodies are the most powerful and memorable tool available to a musician.  Some songs throughout history contain instrumental melodic introductions or run that are even more identifiable and memorable than the chorus (people hear that line and automatically know what song it is).  As we mentioned last time, there are times when a gospel piano player breaks away from the chords of the song in order to play melodic fills and runs.  These lines are often played in octaves or split octaves.  In our musical example there is an octave run that leads into the bridge.  Then there is a split octave run on the third line of the bridge.  These runs help to emphasize main lines in the melody, or lead to new parts of the song.
                In addition to this, short melodies can also be used to fill in the distance traveled from chord to chord.  These melodies are often played in the right hand, but they can also exist in the left.  An interchange between hands can create interesting patterns that add presence and variety. 
                Another technique often used to fill out an arrangement is the use of multiple inversions of the same chord.  This allows the hands to travel up and down the piano covering a greater distance.  These chord inversions can be arpeggiated, or played in block formats.  The motion between inversions can also be filled in with melodic ideas. 
                There are many left hand techniques that can be used to fill out an arrangement.  Some of these include a walking bass line, stride patterns, octave displacement and arpeggios.  Some of these techniques are typical of particular styles and tempos of song, and do not necessarily fit in the style of our example song.  They will be demonstrated in future lessons.  This song lends itself to higher register left hand voicings that are complimented with octave displacement (repeating the bass of the chord an octave or two lower).  When the root of the chord is in the bottom of the voicing, we can play the fifth followed by the root an octave lower.  When the third is in the bottom of the voicing, we can play the root followed by the third an octave lower.  This downward left hand movement can be contrasted by either static left hand voicings, or arpeggios traveling up.

                There are also additional right hand techniques that do not necessarily lend themselves to the style of this musical example.  No song compliments every type of embellishment technique.  Instead, these different techniques often help to accentuate the individual style of the song.  Future examples will highlight other styles and embellishment techniques.
                This Learning Music With Ray video discusses the use of melodic motifs, left hand motion and other techniques to create song arrangements.  These techniques help to fill in the gaps of empty space between our chord voicings.  In it, I continue with our study of the original song He Makes All Things New.  I play through each section of the song using my example of a musical arrangement.  I also provide a detailed breakdown of each section of the song, explaining how it was derived from the chord voicings and what techniques were used to fill in the gaps.  


Wednesday, April 29, 2015

Gospel Piano (part 3) Chord Voicings

                When voicing chords for gospel piano playing, we have the option of packing the pitches close together or spreading them out in an open voicing.  My former lesson on Close and Open Chord Voicings covered this topic with more simple harmonies.  In gospel music, the harmonies tend to include more color tones.  Traveling gradually from open to close voicings (or from close to open) across a musical line creates a nice effect of contrary motion (parts moving in opposite directions). 
                Most gospel piano chord voicings include two or three pitches in the left hand.  When constructing chord voicings that include the root, it is usually placed on the bottom of the voicing (unless otherwise indicated by the chord symbol).  This leaved one other pitch available for a two pitch left hand voicing.  Which pitch we select depends on what register of the piano or left hand is located in and how open or close the overall voicing is.  A third above the root may sound ok in higher registers, but down low on the piano this interval sounds muddy.  Also, this close of a left hand voicing suggests an overall voicing that is close (which doesn’t sound as good in low registers – also muddy).  So, lower left hand positions lend themselves to other intervals above the root.
                The other intervals available in two pitch left hand voicings are the 5th, 7th, 9th and 10th.  Most people can’t reach past the 10th.  The octave is also available, but it sound kind of hollow and ends up doubling the pitch that is already being played by the bass guitar (when playing without a bass guitar this can be used to strengthen the bass line).  These other intervals sound good in most registers of the piano.  However, larger intervals leave less room for the right hand pitches, so they tend to occur more often in lower registers with open voicings.  Fifths work in most situations (low or high).  In high registers they help to create beautiful close voicings.  In low registers they can be used to create a majestic sounding voicing (since herald trumpet playing was based off of open fifths).
                The right hand usual supplies the other pitches of the chord.  In gospel piano, pitches are often doubled to create thick and full texture.  This is opposed to jazz style voicings which tend to avoid doubling in order to stay clean and open sounding.  However, the desired texture is also dependent on the feel of the specific song (or even the moment).  For example, this is a gospel song, but its slow and clean style lends itself to less dense voicings. 
                Capitalizing on common tones is another practice of gospel and jazz musicians.  There will often be one or more pitches that are shared between two adjacent chords.  Maintaining the voicing of these pitches while changing the other pitches usually results in smooth voice leading.
                The chorus is usually the most memorable part of the song.  Sketching the melody of the chorus in our chord voicings can help to emphasize its importance.  Since we are only hitting chords during each chord change (and not every syllable of the melody) we cannot play a complete version of the melody in our chords.  However, we can try to place the melody pitch on the top of our most of our voicings in the chorus to hint at a duplication of the melodic line. 

                Finally, there are times when a gospel piano player breaks away from the chords of the song in order to play melodic fills and runs.  These lines are often played in octaves or split octaves.  In our musical example there is an octave run that leads into the bridge.  Then there is a split octave run on the third line of the bridge.  These runs help to emphasize main lines in the melody, or lead to new parts of the song.
                This Learning Music With Ray video discusses the use of chord voicings typical in gospel piano playing.  In it, I continue with our study of the original song He Makes All Things New.  I play through each section of the song voicing the chords musically (as opposed to using block chords).  I also provide a detailed breakdown of each chord voicing, explaining how they are structured and why they were selected for that musical situation.  I highlight the strategies of contrary motion, common tones, melody sketching and octave runs.